|
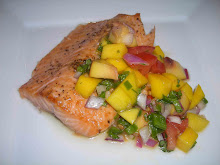
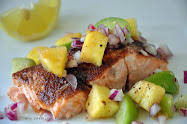
| Salmon with Marsala Sauce |
My Carolina Kitchen quietly celebrated its 8th blogging anniversary this past October. I feel that 8 wonderful years is a respectable time to say good-bye.
I am not planning on disappearing totally. I hope, from time to time, to post some of our new favorite recipes on My Carolina Kitchen 's Facebook page, link here, and hope you'll follow along. altogether.
Blogging has been a wonderful journey for me and brought great pleasure into our lives. I have truly enjoyed getting to know each of you and I thank you for your continued support of My Carolina Kitchen. Along the way Meakin and I have been fortunate enough to have met a number of you in person and we will always treasure those friendships.
Before I say my final good-bye, I would like to share an idea with you. In the last several months I’ve been creating new recipes from old favorites. This idea is not novel or new, but I’ve found it to be truly rewarding and I think you will too.
Here’s how it works – find one of your favorite recipes, choose a component from it, and take that component to create a new recipe.
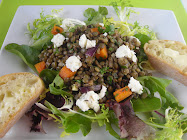
As an example, I choose Pork Marsala and took the Marsala sauce from Pork Marsala, link here, as the component and, instead of serving it over pork, I served it over salmon.
 |
| Pork Marsala |
What I discovered was that the Marsala sauce was equally as delicious on salmon as it was on pork. Take a look.
 |
| Salmon with Marsala Sauce |
Broiled Salmon with Marsala Sauce
Adapted from Pierre Franey, 60 Minute Gourmet & First Home Love Life – serves 4
Printable Recipe
1 1/2 pounds boneless fresh salmon fillets, preferably with the skin intact
2 to 3 teaspoons grape seed oil, or other neutral tasting oil
Kosher salt or sea salt & freshly ground black pepper
Cut the salmon into four pieces approximately the same size and weight. Put salmon on a plate, rub with oil, season with salt & pepper, and allow the salmon to sit at room temperature for 10 to 20 minutes.
Preheat the broiler. Arrange the salmon in one layer, skin side down, on an unheated sheet pan lined with heavy duty foil for easy clean-up. Place the salmon under the broiler about six to seven inches from the source of heat. Broil 8 to 10 minutes or just until the pieces are cooked through. It is not necessary to turn the salmon. If salmon starts to get too crispy on the top, change from broil to bake and bake at 400 degrees until done. Do not overcook or the salmon will be dry. Allow to rest for a few minutes, then serve with the Marsala sauce.
Marsala Sauce
Slightly adapted from First Home Love Life, serves 4
Printable Recipe
2 tablespoons extra-virgin olive oil
2 tablespoons butter
8 ounces sliced baby bella mushrooms
2 peeled and thinly sliced shallots
2 peeled and chopped garlic cloves
½ cup dry Marsala wine
½ cup low-sodium, low fat chicken broth or homemade
1 tablespoon chopped fresh thyme leaves or 1 teaspoon dried
4 fresh thyme sprigs for garnish
Heat olive oil and butter in a 10” non-stick skillet over medium-low heat. Add the mushrooms and sauté, stirring occasionally until they have rendered their juices and are brown. Add shallots and garlic and cook for 1 – 2 minutes more, taking care that the shallots and garlic don’t burn. Add the Marsala wine and chicken broth. Using a wooden spoon, scrape up the fond (brown bits) from the bottom of the pan. Add the chopped fresh thyme, stir to incorporate, then cover the pan and let simmer for about 5 to 8 minutes more.
If the sauce has not thickened to your liking, make a slurry of arrowroot (or cornstarch) and cold water and mix equal parts of arrowroot and water in a small dish and stir with a spoon. Then stir the slurry into the sauce until the sauce is sufficiently thickened. Serve hot. This sauce goes well with pork, salmon or chicken.
 |
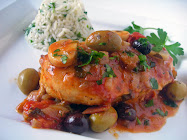
| Chicken Marengo |
Another new recipe was created from another old favorite – Chicken Marengo, shown above, link here. I took the Marengo sauce and served it over lean, bone-in pork chops and it too was a hit. (I apologize for no photo – the dish was half gone before I remembered to photograph it.)
Marengo Sauce
Slightly adapted from “With a Jug of Wine” by Morrison Wood, serves 4
Printable Recipe
2 tablespoons olive oil
4 small white onions, peeled & chopped
1 small clove of garlic, minced
1 ½ cups sliced fresh mushrooms
2 tablespoons minced parsley
4 tomatoes, peeled and sliced (canned, crushed first, are fine, including their juices)
1 cup dry white wine
1 tablespoon brandy
1 tablespoon tomato paste
1 tablespoon flour
Chopped fresh flat-leaf parsley for garnish
Heat olive oil in a large non-stick skillet over medium heat and sauté chopped onions, garlic, mushrooms, parsley in 2 tablespoons olive oil. Cook this mixture, stirring occasionally, until the mushrooms are tender. Add the tomatoes and their juices, dry white wine, brandy, tomato paste and 1 tablespoons flour. Mix and blend the ingredients well and allow to simmer over a medium flame for about 20 to 25 minutes. Serve the sauce hot over pork chops or chicken breasts garnished with chopped parsley.
You get the idea I’m sure. Here’s another example of taking a component from one recipe and trying it in another.
 |
| Chicken Provencal |
I chose a Provencal sauce as the component and, instead of serving it over chicken, (link here) I served it over pork and it was excellent as well.
So voila, as you can see, new recipes can be created from old favorites and at the same time your recipe file will expand. Creating new recipes is rewarding and fun experiment. I hope that you’ll give it a try.
For better viewing, chick photos to enlarge.
Before I go, once again I want to thank each of you for your support of My Carolina Kitchen through the last 8 years. I hope that you’ll continue to try new recipes as well as experimenting with old ones. I know I plan to l continue to do the same.
I'm not planning to totally disappear. From time to time I plan to post some of our new favorite recipes on My Carolina Kitchen's Facebook page, link here, and I would love it if you to followed along.
I’ll leave you with some wise words from Julia Child.
Moderation. Small helpings.
Sample a little bit of everything. These are the secrets of happiness and good health.
- Julia Child


.JPG)